


Your nails will look best if they correspond to the proximal crease of the cuticle line behind the nail. Mirror, mirror…
Tip: Your nails will look best if they correspond to the proximal crease of the cuticle line behind the nail. Most people think their proximal fold is the cuticle, but this is incorrect.
Proximal folds are tight bands of skin at the base of the nail. This is a significant protective film that prevents bacteria and bacteria from entering the nail matrix.
Although I will discuss the proximal fold in this article, I will refer to it as the cuticle line.
If your cuticle lines are square, using a square or square looks good.
If your cuticle lines are rounded, you will look your best with a rounded tip.
As you will see in the photo below, I have more square cuticle lines. I like it square.
Take a good look
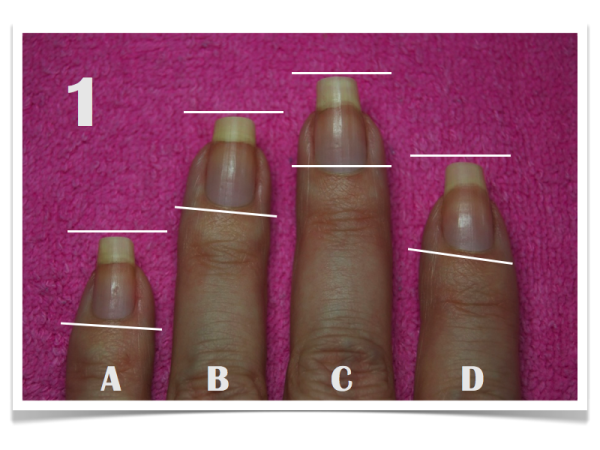
1. Look at your nails and the soft U-shape of your cuticles.
Imagine a line running horizontally through the bottom of the u shape, like finger c in photo 1.
When you file the tip of the nail, you start by bringing the free edge of the nail parallel to the cuticle. This is a general guide to getting started.
In Photo #1, you can see how curved my cuticle lines are. Most people think their proximal fold is the cuticle, but this is incorrect.
Proximal folds are tight bands of skin at the base of the nail. This is a significant protective film that prevents bacteria and bacteria from entering the nail matrix.
Although I will discuss the proximal fold in this article, I will refer to it as the cuticle line.
If your cuticle lines are square, using a square or square looks good.
If your cuticle lines are rounded, you will look your best with a rounded tip.
As you will see in the photo below, I have more square cuticle lines. I like it square.
Take a good look
1. Look at your nails and the soft U-shape of your cuticles.
Imagine a line running horizontally through the bottom of the U shape, like finger C in photo 1.
When you file the tip of the nail, you start by bringing the free edge of the nail parallel to the cuticle. This is a general guide to getting started.
In Photo #1, you can see how curved my cuticle lines are.
Ready, set, start…
2. Using a 240-grain nail file or finer, file the tips of your nails straight. Try to keep the tip of your nail parallel to your cuticle line.
Keep my hands on my thighs just above my knees for stability. Sure, it’ll get nail shavings all over my jeans, but that’s what washing machines are for, right?
Where to apply?
Many bloggers claim that you should only file in one direction.
My mentor, Doug Schoon, author of Nail Structure and Product Chemistry, recently proved this wrong with electron microscope photographs. It’s perfectly okay to shuffle files back and forth like a seesaw.
Thank God! Because that’s how I’ve done my nails my whole life!
Whether your favorite film is paper-centered or crystal-centered, it’s okay to use your favorite filing method.
The other side
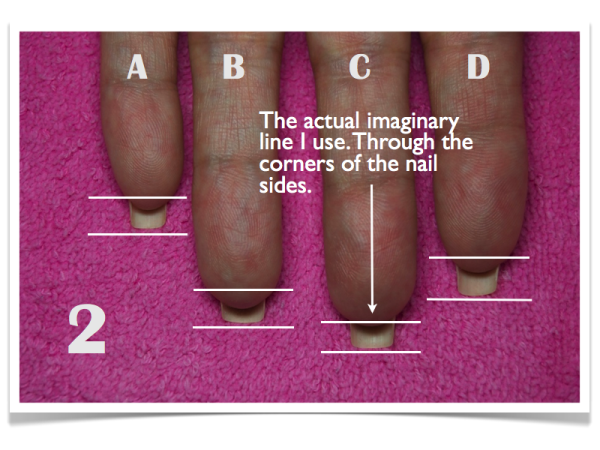
3. Once your nails are flat-topped, turn your hands over, as shown in Figure 2.
Spread your fingers so they’re all pointing up. If I put my fingers together, the tips of my index and pinky fingers will be pulled toward the center.
Look at your fingertips and the line you just filed on your nails. I used an imaginary line, just like finger C in photo 2.
Are your tips parallel, or is one side higher than the other? They should be parallel. Repair uneven parts.
This is your last straight line.
Believe the other side
4. If Step 3 affects the parallel lines of one of your fingers when you flip your hand, you most likely have a curved cuticle line. It may feel strange, but stick to the lines you flipped out with your hand.
Rounded curves are in fashion
5 To get SQUOVAL, file off the sharp corners of each nail and bend the top edge of the nail slightly.
I mean a little!
Just take a little bit on the sides to soften the lines so they’re not straight like a ruler.
Finish school
6. Using a 400-grit nail file or higher, smooth the free edges of each nail. Keep the file perpendicular to the tip and gently sand it from top to bottom. Now, you can get a manicure.
